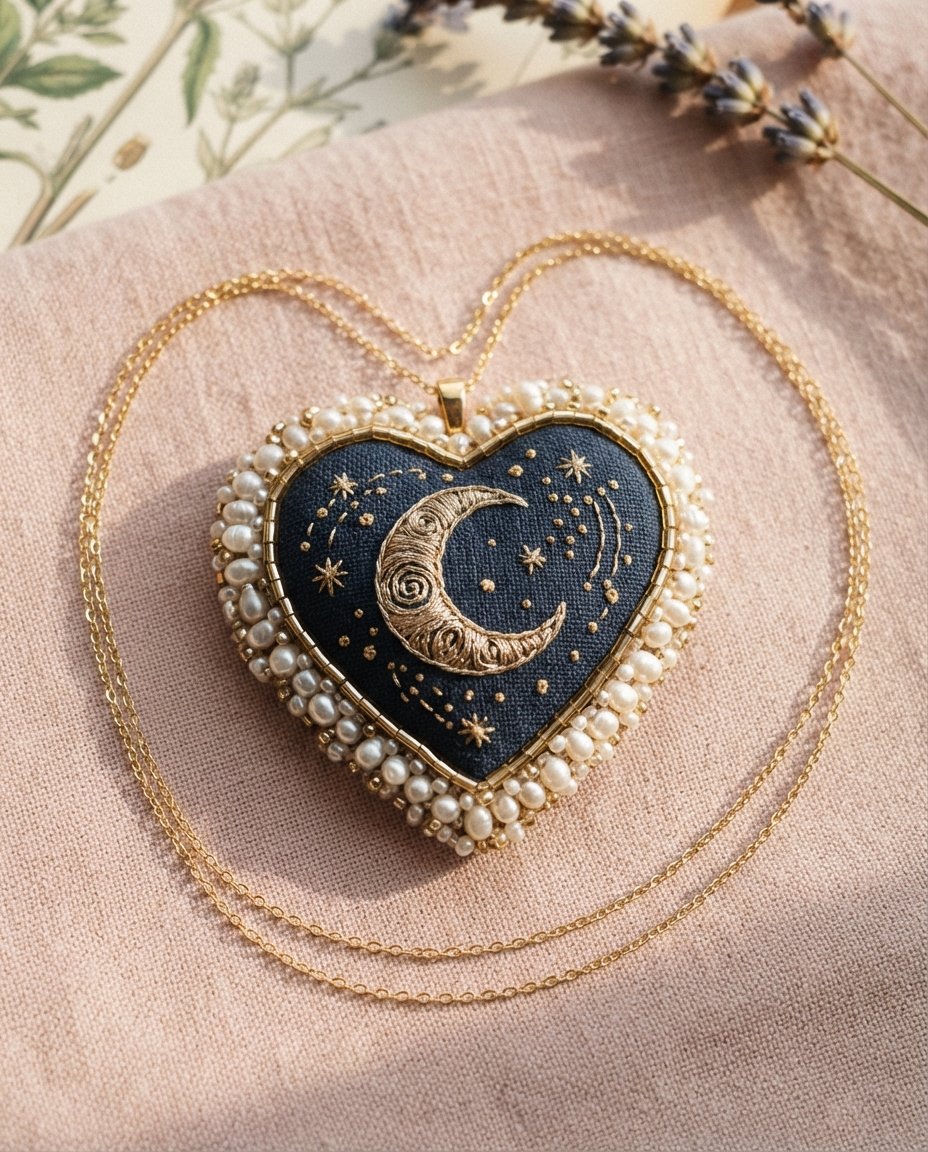
Celestial jewelry has a way of making an outfit feel personal. A deep-blue embroidered heart decorated with tiny stars, a crescent moon, pearls, and golden beads combines a romantic shape with a night-sky theme. The result looks intricate and luxurious, yet the design can be approached one small section at a time. This guide explains how to plan and make your own celestial beaded heart pendant, with practical tips for neat embroidery, balanced embellishment, and a polished finish.
What Makes a Celestial Beaded Heart Pendant Special?
The appeal of this style comes from contrast: rich navy thread against warm gold details, soft pearl-like beads beside sparkling metallic accents, and a crescent moon surrounded by tiny stars. The heart silhouette keeps the piece sweet and wearable, while the celestial details give it a dreamy, vintage-inspired character. You can keep the palette classic or adapt it with midnight purple, teal, champagne, or silver.
Materials and Tools
Gather your supplies before starting. Exact bead sizes can vary, so choose pieces that sit comfortably together and are suitable for hand embroidery.
- A small piece of firm felt or beading foundation in navy blue
- Blue embroidery thread or fine beading thread
- A heart-shaped paper template
- Small gold seed beads and short bugle beads
- Pearl beads in a few coordinated sizes
- A selection of tiny star-shaped or faceted accent beads
- Gold-toned beads or crystals for a crescent moon motif
- Fine beading needles and sharp embroidery scissors
- Backing material, a pendant bail or necklace finding, and jewelry adhesive if needed
- A fine chain in a matching gold tone
Plan the Design Before You Stitch
Draw a heart on paper and mark the central crescent moon, a few larger stars, and the smaller scattered dots around them. Keep the moon near the center so it becomes the focal point. Place the largest pearls around the outer edge, leaving enough room for the gold border. A quick paper layout helps you judge spacing before any beads are attached.
Think in layers. The embroidered blue surface forms the background, the moon and stars create the central artwork, and the pearl-and-gold edging frames the silhouette. Repeating a few bead types around the border helps the finished piece look intentional rather than crowded.
Step-by-Step: Making the Beaded Heart
1. Prepare the heart base
Trace the heart template onto the felt or beading foundation and cut it out neatly. If the material is soft, consider stabilizing it with a second layer. Keep the outline smooth because the final bead border will follow this edge.
2. Create the blue embroidered background
Cover the visible surface with close, even stitches using navy or denim-blue thread. Work in small sections and keep the thread tension consistent so the base stays flat. Trim loose fibers carefully, then check that no large gaps remain where the foundation shows through.
3. Add the crescent moon
Arrange gold-toned beads or small crystals into a crescent shape on the center of the heart. Stitch them down securely, following the curve gradually rather than trying to complete the shape in one long line. A mix of bead finishes can create a subtle dimensional effect without making the moon too heavy.
4. Embroider stars and tiny points of light
Place a few larger star motifs around the moon, then fill the remaining spaces with tiny gold beads. Vary the size and direction slightly to suggest a scattered night sky. Step back from the work every so often: the design should feel balanced from a distance, not just detailed up close.
5. Build the pearl and gold border
Stitch small gold beads around the heart outline first, keeping the spacing even. Add pearl beads around the outside, alternating sizes if you like. Work slowly around the curves and corners, and avoid pulling the thread so tightly that the edge puckers. Secure the final stitches on the back.
6. Finish the pendant neatly
Trim the base carefully without cutting any stitches. Add a backing layer to conceal the thread ends, then attach a pendant bail or suitable necklace finding. Check every bead with a gentle touch before adding the chain. If the pendant will be worn often, reinforce the attachment point and allow any adhesive to cure fully according to its instructions.
Color Ideas to Make the Design Your Own
- Midnight and gold: navy thread, warm gold beads, and ivory pearls for a classic celestial look.
- Moonlit silver: charcoal or deep-blue thread with silver seed beads and cool white pearls.
- Soft celestial: dusty lavender, champagne accents, and pale blush pearls for a gentler romantic finish.
- Ocean night: deep teal thread with antique gold and iridescent beads.
Tips for a Professional-Looking Result
Use a beading needle that passes easily through your smallest beads, and test the thread strength before beginning. Keep the back of the work tidy, secure thread ends with small knots between layers, and avoid placing bulky beads where the pendant needs to lie flat. If you are new to bead embroidery, practice the crescent and star motifs on a small felt scrap first.
Most importantly, let the design breathe. A few well-placed stars and pearls usually look more refined than filling every open space. The contrast between the blue stitched surface and the metallic details is what gives this pendant its distinctive character.
How to Style a Celestial Heart Necklace
Let the pendant be the focal point by pairing it with a simple top, an open neckline, or a soft knit. Gold-toned earrings or a delicate bracelet can echo the metal details without competing with the beadwork. For a layered look, combine it with a fine plain chain of a different length.
Final Thoughts
A celestial beaded heart pendant is a lovely project for anyone who enjoys embroidery, tiny details, and meaningful handmade accessories. With a stable base, a thoughtful layout, and patient stitching, you can create a piece that feels unique and special. Adjust the colors and motifs to make the night sky your own, and enjoy the slow, satisfying process of bringing each little detail to life.